Search This Blog

Tuesday 30 June 2015

Top 7 Ways To Improve The Energy Efficiency Of Your Garage


Learn how to become more energy efficient!
Your garage is probably the most inefficient room of your house, but it doesn't have to be that way!
Many people don't see their garage as an extension to their home, but rather an extension to the outside. In reality, most attached garages should not be treated much differently than any other room inside the home. The more efficient your garage is built upon, the lower your home's overall carbon footprint is going to be. What happens, is an inefficient garage practically inhales the blustery cold air during the winter and super heated air during the summer. That cold or hot air then penetrates through the walls and ceiling of the surrounding living spaces and wrecks havoc on the efficiency of the home. But it doesn't have to be this way. Here's what you can do to improve upon that.

Insulate the Surrounding Walls to the Garage


Cost: $1,000 and up for the standard two door garage.
Many older homes (and even some newer ones) were not built with insulation in the walls of the garage. Many of these homes have only outside siding, radiant sheathing, and a layer of particle board protecting your garage walls from the elements. Insulating your garage walls is usually as easy as rolling the proper R-value insulation between your joists, or having it blown-in through a small hole in the drywall of the sides and ceilings of your garage.

Caulk the Connection Between the Walls and Concrete Floor


Cost: $5 for a few tubes of caulking.
Many garages are not built using the proper compressible foam between the lower framing and concrete floor. What happens is over time this connection swells, shrinks, and moves, leaving spaces which will allow air from the outside to leak in. You can either use a foam sealant or a latex/silicone based caulk to seal this often overlooked area.

Seal the Door Between the House and Garage
Cost: $10 and up for weatherstripping.
First thing is to make sure that there is weatherstripping installed around the entire door frame, and that it is intact, pliable, and seals out most of the air from the garage. You can use smoke to detect air leaks around the door, or an even easier way is to turn on the lights to the garage and turn them off on the inside portion of the door and see if any light comes through. Next, make sure that your threshold is sealing the bottom of the door properly. You can use a simple draft stopper if you do not want to go through the hassle of replacing the entire threshold. One last often overlooked project is to caulk the trim around the inside and outside portion of the door. Air can find a way through the inner construction of the door frame if this decorative trim is not sealed properly.

Insulate the Garage Door Itself

Cost: $50 to upwards of $1,000.
Even if your garage walls have been properly insulated, many home builders do not bother with the added expense of purchasing an insulated garage door. This negates much of the purpose to insulation in the walls, since a thin sheet of aluminum does one thing best, and that is transfer both the heat and cold from the outside, directly to the inside. You can purchase a new insulated door for several hundred dollars, or buy an insulation kit for a fraction of the cost. These kits use thin sheets of double-bubble radiant insulation which is applied to the inside of the garage door where it will radiate heat away from the door in the summer, and hold heat in during the winter. You can also use foam board insulation for this same purpose.

Insulate the Outlets and Light Switches to the Garage

Cost: $5 for specialized outlet/switch foam gaskets.

It is important to seal all the tiny cracks in your garage, so that air cannot seep to the inside of your living space. Not only should you be concerned about the penetration of hot or cold garage air through the walls, but also the carbon monoxide which is present after a vehicle has either entered or left the garage. These fumes can find their way into the smallest spaces between the walls and then enter your home without you even knowing it.

Add Passive Solar Heating


Cost: $50 and up for a homemade unit.
One of today's ultimate workshop conveniences in the wintertime is to have a heated garage. Attaining this with either a gas or electric heater is both expensive and carbon costly. However, if you can harness the heat from the sun, you can have your heat and not feel guilty about it. The labor involved in building such a unit is fairly straight forward as long as you have a few basic hand tools and craft experience.

Seal the Cracks in the Garage Cement Floor

Cost: $5 for a tube of concrete sealant.
Poured cement is certainly not the best insulation, but when its surface is compromised by cracks, it becomes even worse. Cold air and gases from the ground can pass through to the garage when a small crack is present. To make matters worse, if you are constantly introducing water into these cracks, such as after driving in a snow storm, the water can freeze and expand below the cement causing upheaval and shifting. If the concrete slab shifts too much, the floor will become uneven and this will compromise the ability for the garage door to completely seal in the closed position

source:- http://home.howstuffworks.com/home-improvement/heating-and-cooling/improve-energy-efficiency-garage.htm
.

Monday 29 June 2015

How To Apply Epoxy Floor Paint To Your Garage


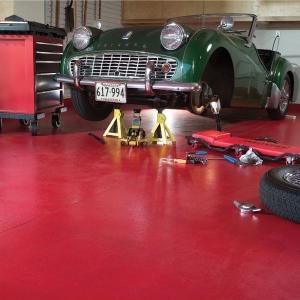
Transform a dull garage floor into a brilliantly colored auto showroom in one long weekend with a durable, professional quality epoxy floor finish.
By the DIY experts of The Family Handyman Magazine


TIME

    Multi-day

COMPLEXITY

   Moderate

COST

   $100 - $500

e


Evaluate your garage floor

Epoxy is a tough, long-lasting coating that you paint onto the concrete. It resists grease, oil and many other substances that would ruin ordinary paint. It cleans easily and can be found in a variety of colors (if you look hard enough), so you can keep your garage floor sparkling clean and attractive for years.
However, the reality of this challenging project is, one, not all concrete floors will hold a coating, and two, preparing concrete can be labor intensive and tedious. That said, this story will help you assess your concrete’s condition, show you how to clean and etch it, and demonstrate how to apply an epoxy surface that will handle car traffic, chemicals, oils, salt and scraping better than any other paint or stain.
As with any other paint job, success lies in the prep work. Plan to spend the first day removing oil spots, cleaning/degreasing the floor, etching it with a mild acid, and scrubbing, vacuuming and rinsing (a lot!). Day two is for filling cracks and applying the first coat of epoxy, which is followed by a second coat on day three. This job doesn't require many special tools. But to do the best job (and save your back), we recommend that you rent a walk-behind power floor scrubber (Photo 2) with a stiff brush attachment. Brushes work better than scrubbing pads on concrete, but buy two pads if a brush isn't available. Also, rent a wet vacuum if you don't own or have access to one.
Test Your Concrete for Moisture
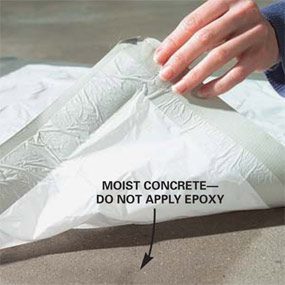
Lift the corner of a plastic bag that's been taped to the garage floor for 24 hours. If it's dry underneath, you can proceed with an epoxy coating. If you see moisture under the plastic, don't coat the floor with epoxy; water pressure will break the bond.
Test floor for moisture
Check for trapped moisture

Analyze the floor and weather

Before you even consider epoxy paint for your floor, test to determine if dampness is coming up through the concrete from the ground. If moisture is evident, your floor isn't suitable for epoxy. Also, forgo the project if a concrete sealer was previously used (you'll know a sealer has been used if water beads up when applied to the surface). If you're dealing with a new slab, you must wait a minimum of 28 days, preferably two months, for the floor to cure and dry thoroughly before applying a garage floor coating. And if you're dealing with a previously painted floor, the best advice is to remove the paint, especially when you're applying a solvent-based epoxy that could soften any that remains.
If your concrete passed these tests, make sure the weekend weather passes too. The temperature of the concrete must be a minimum of 55 degrees F, with an air temperature between 60 and 90 degrees for optimum epoxy curing/drying.

Floor cleaning

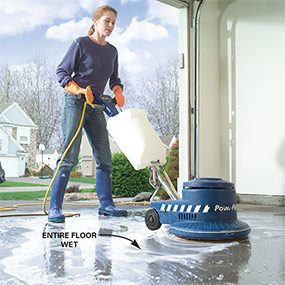
Photo 2: Use an electric floor scrubber


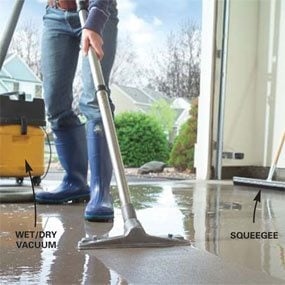
Photo 3: Vacuum the wet floor

Push a rubber squeegee along the floor and pool the soap mixture into smaller areas. Vacuum up the solution for proper disposal.
Wet the entire floor with a hose, then scrub back and forth using an electric floor scrubber with a brush attachment (or a coarse scrubbing pad if a brush attachment is unavailable). Pour cleaner/degreaser mixture onto the floor as you go to keep suds


To begin, use a flat-edged shovel or scraper to loosen hardened surface debris, then sweep it out with a stiff-bristle garage broom.
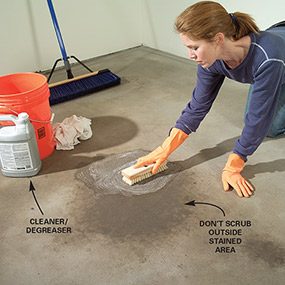
Next, mix up a 5-gallon batch of water and concrete cleaner/degreaser according to label directions (found at home centers and hardware stores).
Once spots are cleaned, power-scrub the entire floor (Photo 2). To clean a two-car garage floor, plan on scrubbing for 20 to 30 minutes (keep the floor wet at all times). Make sure you scrub with a stiff-bristle hand brush along the walls and in the corners where the machine cannot reach. Once you're satisfied with dirt removal, vacuum up the cleaner for proper disposal (Photo 3). Don't just wash the product down the drive into the storm sewer. The environmental effects of cleaning products can vary widely. Check the product label or call the manufacturer for the proper waste disposal method. We looked up the Material Safety Data Sheet for the product we used (made by Behr) on the Web site www.msdssearch.com and learned we could pour the waste into the “sanitary sewer” (toilet). Also check the label or call the manufacturer for instructions on safe disposal of all leftover product and containers. When in doubt, call your city or county environmental office.

Etch the concrete with muriatic acid

Photo 5: Power scrub the floor again

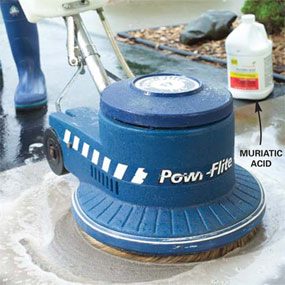
Power-scrub the 10 x 10-ft. area for 5 to 10 minutes. Repeat sprinkling/ scrubbing for each 100-sq.-ft. section, making sure the entire floor stays wet. When you're done, spray a large volume of water on the floor to flush the residue out. Power scrub again, then rinse two or three times. Let the floor dry overnight, until it appears white.


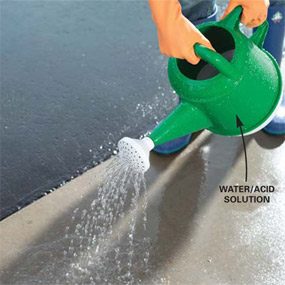
Before etching concrete with the acid solution (Photo 4), hose down your entire driveway and several feet beyond the sides of the drive. This aids in the final rinse out of the garage so the material will flow more easily down the driveway. Now sprinkle the 10:1 ratio of water to muriatic acid mixture and power-scrub the floor (with a rinsed brush attachment or new pad; Photos 4 and 5).
When you're finished, take your hose and nozzle end and flood the floor with water, spraying the material out of the garage for a good 10 minutes (diluted muriatic acid can be rinsed with large volumes of water into a storm sewer, according to the manufacturer). Rinse off the power scrubber brush/pad, then scrub the wet floor one last time for 5 to 10 minutes.
Finally, rinse out the entire floor and driveway two to three more times. The concrete surface should now feel like fine-grit sandpaper. If not, you need to repeat the acid washing. Finally, to speed the drying process, squeegee out any remaining pooled water, and take a rag and dry any remaining spots, cracks or chipped areas. Leave the garage door open overnight to speed drying.
CAUTION!
Always add acid to water, not water to acid and wear an organic vapor/acid respirator (Photo 7).

Choosing an epoxy

The final critical decision is what type of epoxy to use. Epoxy floor paints are tough resins that come in two separate parts that you mix together just before you apply them. You can divide them roughly into three types: 100 percent solids, solvent based and water based.
The 100 percent solid type is almost pure epoxy; it doesn't contain solvents that evaporate. These products are expensive and difficult to handle because they harden so rapidly. They're best left to the pros.
The solvent-based epoxies typically contain from 40 to 60 percent solids (epoxy). They penetrate and adhere well and are the choice of most pros. And they're often available in a wide range of colors, which is one reason we chose this type for our demonstration. But they do have some drawbacks. The solvents are powerful and potentially hazardous; you MUST use a respirator (a 3M 5000 series respirator with an organic vapor/acid gas filter, or the equivalent in another brand). The respirator must fit tightly to your face so you don't breathe the fumes. In addition, you must ventilate the garage well and keep other people away from the odors.
Solvent-based epoxies also may be harder to find. Some paint specialty stores may carry them (Sherwin- Williams and ICI Dulux, among others), but otherwise you'll have to go to an industrial supply–type store. Check the Yellow Pages under “Paint, Wholesale & Manufacturers” or “Industrial Equipment & Supplies, ” or look online.
The water-based epoxies also have two parts that you mix just before application. And they also typically contain 40 to 60 percent solids. The benefit of this type of epoxy is that there are no hazardous solvent fumes. And at least one brand, Rust-Oleum's EpoxyShield Garage Floor Coating, is widely available at home centers.
Whether you're working with solvent- or water-based epoxy, we recommend that you apply two coats to get enough build for long-term wear and durability. “Build” refers to the thickness of the dried epoxy film. Typically, an epoxy with a higher solid content will give a higher build. And, in general, prices tend to reflect the amount of epoxy in the mix—the more epoxy, the higher the build and the higher the price.
For a two-car garage (450 sq. ft.), you'll need 2 to 3 gallons per coat (depending on the percent of solids in the epoxy you buy—read the container). Check the cans for coverage to make sure you buy enough.
CAUTION!
Wear appropriate gloves, eye and lung protection, and rubber boots, according to the product labels. Turn off gas to the water heater or any other appliance located in the garage. And take precautions to keep children and pets away from the garage and driveway.

Patch the cracks

First thing in the morning, after the floor has dried overnight, fill 1/4-in. cracks and larger, plus holes or spalled areas, with an epoxy crack filler, available at home centers. Use a plastic putty knife to scrape the surface level and smooth. Let this dry for four hours (check label directions) before you begin painting your first coat of epoxy.

First coat of epoxy

Photo 7: Brush on epoxy around the perimeter

Tape the area directly underneath the garage door with duct or masking tape, then brush a 4-in. strip of epoxy along the walls and against the tape.


Photo 8: Load the roller

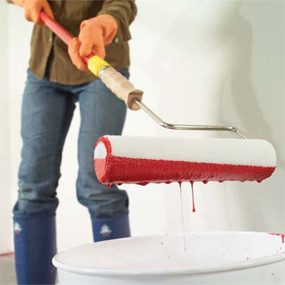
Dip a 9-in. wide, 3/16-in. short-nap epoxy roller into the bucket so only the bottom half of the roller is covered. (This helps keep epoxy out of the roller.)


Photo 9: Roll on the epoxy

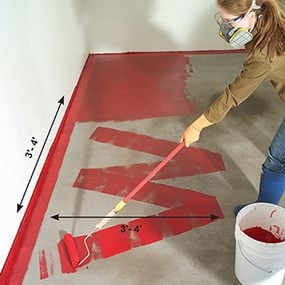
Paint a big wet “W” pattern that's about 3 to 4 ft. square, then backroll to fill in the pattern—all in 60 seconds. Finish by going over it lightly to remove roller marks.


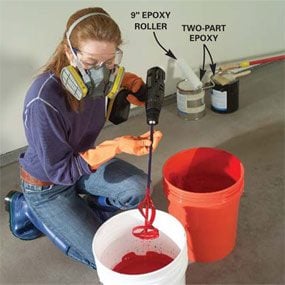
Mix the correct amount of epoxy (Photo 6) to cover the square footage of your garage floor according to label directions. It's critical that you allow the mixed product to stand undisturbed for the specified time on the label before applying it. You also must apply the entire batch you mixed up before the specified time expires. We used a 40 percent solid, solvent-based epoxy from a local industrial supplier/manufacturer that had to sit for 30 minutes, and the batch had to be used up within 24 hours (and it was offered in almost 20 colors).
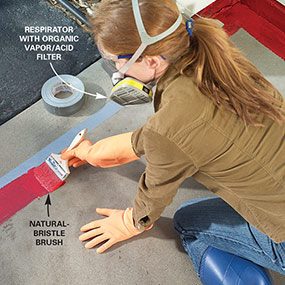
While waiting for the crack filler to cure, use a high-quality natural-bristle paint brush and cut in the floor edges (Photo 7). Also, tape the area directly underneath the garage door with masking or duct tape, allowing you to shut the door overnight. This is intended to keep out dust, dirt, pets and children until the floor is dry. And put a “Do Not Enter” sign along with tape across the doorway leading to the garage from the house.
Coating the floor
If you move at a steady pace (Photo 9), you should finish your two-car garage floor in less than one hour. (Remember not to paint yourself into a corner!) The solvent odors are powerful. Be sure to wear a respirator (Photo 7) and keep the garage door open at least an hour after coating.
Tips:
Keep a clean cotton rag handy and some Xylol epoxy thinner (for solvent-based epoxy) to clean up epoxy drips and spills.
Consider adding epoxy paint to the bottom 4 in. of drywall, wood or concrete wall along the floor to protect it when you hose the floor clean in the future.

Second coat

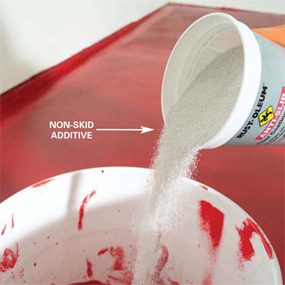
Let the first coat dry overnight, for a minimum of 16 hours (or according to label directions, since epoxy products vary). Add a non-skid product to the epoxy (Photo 10) for the second coat, especially if your vehicles drag snow and moisture into the garage, or you'd feel safer on a less slippery floor. Repeat the “cutting in” and floor painting like the day before (Photos 7 – 9).
Wait another 16 hours (check label directions) after finishing before allowing foot traffic. You can start parking your cars on the floor after approximately three to seven days (depending on the epoxy label directions). A full cure for the floor takes approximately one month.
Tip:
A coat of floor wax applied over the top of a cured epoxy floor will make it easier to clean.


Required Tools for this Project

Have the necessary tools for this DIY project lined up before you start—you’ll save time and frustration.
  • Wet/Dry Shop Vacuum
  • Paintbrush
  • Paint roller
  • Wheelbarrow
Power floor scrubber (rental), stiff bristle brush, organic vapor/acid respirator, rubber boots, rubber gloves, safety glasses.

Required Materials for this Project

Avoid last-minute shopping trips by having all your materials ready ahead of time. Here's a list.
  • Cleaner/degreaser fluid
  • Muriatic acid
  • Epoxy crack filler
  • Epoxy floor paint

Shopping List

source:- http://www.familyhandyman.com/garage/how-to-apply-epoxy-floor-paint-to-your-garage/view-all

Sunday 28 June 2015

Insulating A Garage: Is It Worth The Money?


Garage InsulationSaving money on energy bills is a good thing, especially in very warm or cold climates where the AC or the furnace have to run a lot. It can costs hundreds of dollars a month to make the living space comfortable. However, the garage is a different story. Trust me, I found out the hard way. I will never recoup the money I spent insulating it, and on very cold days, the paint and other supplies still get ruined.
Here in Colorado, temperatures can drop into the single digits. My goal was to keep as much heat from the car engine in the garage as possible. I just wanted to make it a little more comfortable and hopefully keep the temperature above 32°F so paint and other stuff like caulking tubes wouldn’t get ruined. I spent about $1,500 insulating the walls, ceiling and the door itself. I knew I wasn’t going to make it super warm like inside the house, because I wasn’t actively heating it with natural gas or electricity. In the end, I can tell you, it was a waste of money.
Bottom line is, unless your garage is heated, insulation will have little affect on the temperature inside your garage in cold climates. Just because you add insulation won’t make the garage that much warmer or cooler. The main purpose of insulation is to slow the conduction of heat from the walls and ceiling to the outside and vice-verse. Insulation by itself does not generate heat. If your garage is already cold, the area will virtually remain the same temperature whether you have insulation or not. And remember this, when you open your garage door, you recycle the air in a matter of seconds then trap the new cold air until you open the door again. And no, things like a refrigerator, freezer, or lights will not heat the garage to make the insulation worthwhile. In warm climates, it may be worthwhile, but I don’t live in one so I couldn’t tell you one way or another.
Now if I spent a lot of time in the garage and added a heater, that’s a different story and I would probably see a big difference. In that case, insulating the garage is definitely worth it because I’d want as much of the heat to stay in the garage for as long as possible (running a heater costs a lot of money).
Some have argued that the wall(s) which separate the main house from the garage will allow some heat to pass and thus warm the garage, but that shouldn’t be the case! The walls which separate the garage from your main house should be insulated to prevent as much heat as possible from conducting into the garage from the house. If those walls are not insulated or not insulated enough such that your garage is warm without a heater, then that is something I would fix immediately so as to retain as much heat as you can in the living space of your house where your heater is working hard to keep it warm. In that case, adding more insulation may be necessary which will save you money.
Now, if you do want a warm garage, then I would add a heater and insulate the ceiling, walls, and garage door. Depending on the size of your garage, insulating the walls with batts of R-13 will typically run you about $400, the ceiling $600, and the garage door will cost about $600 if you do it right. You can use the pink Styrofoam stuff from Home Depot, but that will only insulate your door to about R-6. If you spend a lot of time in the garage, buying an whole new insulated garage door might be better, but it will cost you about $1500 alone. So if you do just the walls and the ceiling, it’s probably going to run you $1,000. A bit pricey if you don’t spend any time in the garage.
But before you do anything, the best way to make your garage a little more comfortable is to stop any cold air infiltrating into your garage from the outside. Put new weather-stripping down where the garage door makes contact with the ground. If you have a door entrance from outside into the garage, make sure the seal is intact and no air is coming in around the frame. Use expanding foam to fill in gaps. These are good first steps that will only cost you about $80 and can make quite a difference. Even a slight draft can make your garage feel much colder than it really is, especially when it’s 10°F outside.
source:- http://www.weatherimagery.com/blog/insulating-garage/

Saturday 27 June 2015

10 Ways To Take Back Your Garage

How to stash your stuff and have room for your cars, too


Photo: Paul Salzman

“The garage is where clutter goes to die,” jokes Amanda M. LeBlanc, a professional organizer in Birmingham, Ala.
Many of you said the same thing in Consumer Reports' recent nationwide poll of almost 1,000 garage owners. Filled with tools, lawn mowers, sports equipment, and more, the garages of 62 percent of Americans are crowded, disorganized, or a mess. Shocker: Almost a third of us don’t park our car in the garage no matter how large, and only 25 percent of people with three-car garages actually park three cars there.
Sound familiar? Even if you can still squeeze into your garage, getting from the car to the house shouldn’t be an obstacle course. Help is at hand.
First, cull (be ruthless). Then plan.
Divide items in your garage into four groups: sell (watch our video, below), donate, trash, and keep. That will give you a better idea of how much storage you need, and what kind. And if you call in a pro to install a system, you won’t wind up with one that’s more extensive and expensive than necessary.
Overall, your objective in this step is to get as much as you can off the garage floor and onto the walls or shelves. With that done, you can start planning. Ask yourself whether you prefer to store items behind closed doors, on open shelves, or a mix of both. Also, are there items cluttering up indoor living spaces that you’d like to store in the garage? And last, think about future needs. If you own a Mini Cooper but will be trading it in for an SUV, or vice versa, consider the size of future cars.
Remember to allow for the swing of car doors, plus room to exit and enter, when measuring. That way you’ll know how many linear feet are actually available for storage. Typically, the wall facing the hood will have room for deep shelves or cabinets, but side walls will have space only for shallow storage.
Consider our four scenarios, no matter what you’re storing. Tackle one problem or all of them if you’re feeling ambitious. Then you might be able to park your car—or even another car—in your garage.

Send your tips and photps

Inspired by our organization advice? Please send your garage storage before-and-after photos to garagemakeover@cr.consumer.org.

1. For do-it-yourselfers

A whopping 78 percent of people surveyed store tools or a workbench in their garage, and 44 percent use the space as a workshop. A slat wall, wire grid, or pegboard will keep your tools in plain sight. Opt for cabinets with doors and drawers if you prefer things to be stowed away or you want to keep them from young children. Unless you have an oversized garage, cabinets that are 24 inches deep and a workbench will probably fit only at the rear of the garage.
  • If space is a premium or you maintain your own car, consider tool cabinets on wheels, which you can move into the center of the garage or the driveway.
  • A workbench that lets you adjust the height is handy for different jobs and for users of different heights.
  • Consider a workbench with a sealed, laminate, or plastic surface. Those types resist stains best, according to our tests. A wood or metal table is also a good option.

2. For gardeners

You’ll probably want wall storage and shelves for hand tools, potting soil, peat moss, and fertilizer. Lawn mowers and heavy pots will need space on the floor. If you need a new mower, consider the Toro 20339 SmartStow, $350. It can be stored upright to save space and performed very well in our tests, though it was a bit difficult to push, pull, and turn.
  • Use a wall system for your rakes, hoes, and other tall items. An ideal place is along a side wall because those items don’t protrude much. Mount trowels, bulb planters, and other hand tools on a pegboard, either on individual hooks or perhaps in wire or clear plastic bins for visibility.
  • If there’s space, consider a potting bench along the back wall, with some grow lights. Benches made of cedar, cypress, or galvanized steel will stand the test of time.


3. For sports equipment

“If kids have to open a door, put in something, and close the door, forget it,” says Derrek Holland, who owns The Closet Doctor in Lincoln, Calif. “They’ll leave it on the floor.” A slat wall, track, or grid system can be fitted with hooks for specialized holders for balls, mitts, backpacks, rackets, skateboards, skis, bikes, and more. You can also mount hooks and other holders directly on the wall. Ditto for pegboards, which also come in galvanized steel. More tips:
  • A slat wall or grid system allows you to easily raise hooks and accessories as kids get taller.
  • Wall-mounted wire baskets, mesh bags, and clear, open bins stow items in clear view.
  • An exception to the keep-the-floor-clear rule is a floor bike rack, which allows youngsters to ride right into the garage and park. When they’re older and stronger, swap it for a wall-mounted rack. No kids? Consider suspending bikes from the ceiling with a bike lift, either motorized or manual.
  • A hoist allows you to get your canoe or kayak up and down without damaging it or harming yourself in the process. Be sure to check the weight that the units can hold as well as the head room your garage door needs.

4. For bulk and rarely used items

The ceiling has become the new frontier in garage storage, with systems designed to hold items as varied as hurricane shutters, big coolers, and surfboards. Overhead storage is an economical alternative to a cabinet for large, long, and relatively flat objects.
  • A ceiling-mounted shelf is the ideal place for such lightweight items as holiday decorations and out-of-season clothing. Most are designed to allow plastic bins to sit securely in slots. Mesh sides add another measure of stability.
  • For bulk purchases, keep extra cleaning supplies and nonperishable foods near the inner door to the house.
  • Paper records can go into bins, but the weight makes them better for a shelf mounted high on a wall rather than above a car. Some rail-storage systems have wall braces and accommodate bins above.
  • Use clear plastic bins to hold more than one type of item. Opaque bins are fine for out-of-season clothes, old business records, etc., if they’re clearly labeled.

3 things you shouldn’t keep in your garage

Paint or solvent: Wide temperature swings can damage paint. Cold is especially bad because it can freeze the water in paint.
A refrigerator or freezer: When your garage is cold, the machine’s compressor won’t run long enough to properly cool the freezer. When the garage is hot, the fridge will work overtime to stay cool, driving up your electric bill. 
Gasoline or oil: Pilot lights, like those on a water heater, and flammable vapors are the problem here. The vapors could cause a fire or an explosion. Even in a detached garage, you want to be sure that gas is stored in an approved container. Keep only as much gas as you’ll use in a few weeks.

5 smart storage options

Depending on how many components you select and which types, you should be able to outfit two walls in a standard garage with open shelving for $1,000 to $2,000. Adding some cabinets will probably push the cost above $2,500, as will hiring an installer.

Hooks and baskets

The most basic and inexpensive approach is to simply install hooks, baskets, or other devices directly on a wall, using appropriate fasteners for studs, concrete/cement blocks, or gypsum board surfaces. Pegboard (now also available in sleek galvanized steel) with an array of hooks and fasteners is another easy and inexpensive option.

Track system

A track system can simply be a horizontal rail that allows you to attach various kinds of hooks, baskets, or mesh bags; others can also support cabinets or shelving. The highest-quality tracks are made of steel, preferably with an enamel coating, which can handle more weight and won’t rust unless scratched. You can reconfigure the system as your needs change.

Wire grids

Wire grids are usually made of metal with an epoxy or vinyl coating, although some are made of a strong polymer that looks like brushed chrome. Wall grids come in a variety of sizes, can be mounted vertically or horizontally, and come in different strengths to handle different weight requirements. When fitted with hooks, fasteners, and accessories, they can hold almost any item you want to stow. Reposition fasteners and accessories at any time or even move the grid up the wall as your kids grow.

Slat walls

Originally made of melamine clad particleboard or medium-density fiberboard for store displays, slat walls are the latest trend in garage storage. And now they also come in aluminum, PVC, resin, and steel, all of which are more durable than melamine. Horizontal grooves in the board accept baskets, bins, hooks, and other accessories. You can go whole hog by lining an entire wall with 4x8-foot panels. Some systems ­offer cabinets that can be mounted right on a slat wall and repositioned as desired. Or run two, four, or more horizontal slats at selected points on the wall.

Cabinets

Cabinet options include melamine laminated on MDF or plywood, injection-molded resin, or steel. Laminated cabinets may not hold up well if your workshop area gets a lot of use or is exposed to frequent moisture. Ditto organizers with cardboard backs. Avoid thin, flexible plastic cabinets; the shelves may sag, and the doors may not close properly. Thin steel cabinets can have similar problems. Look for thicker, lower-gauge steel, which is stronger.
Hanging cabinets reduce the likelihood of moisture transfer from the garage floor, which can delaminate melamine cabinets and rust steel ones. Hanging cabinets also ensures that they will be level; otherwise, the slight downward pitch of the floor that diverts water toward the garage doors means the cabinets may not line up perfectly and the doors may be more difficult to open. Some companies add front legs to deep cabinets for added support. Sliding cabinet doors make access easier than swinging doors when a car is parked nearby.

Tips for a smooth installation

No matter the storage system and the clarity of the directions, a second set of hands will usually make the work easier. These simple—though often ignored—steps can help avoid problems:


• Plan to spend several hours assembling and installing a unit.

• Read all of the directions before you start putting the pieces together.

• Find and mark wall studs before attaching anything to the walls. Most studs are 16 inches from center to center.

• Do an inventory of the parts. If somethingis missing, it’s better to find out early so that you can request a replacement. If it’s a crucial part, you might want to wait until it arrives to get started.

• Measure twice, cut once. Before you cut wall brackets and other pieces, make sure that your measurements are accurate.

• Use a cordless screwdriver or drill to speed the work of driving many screws.

source:- http://www.consumerreports.org/cro/magazine/2015/05/10-ways-to-take-back-your-garage/index.htm